Saturday, May 19, 2012

Foam Core?

One of my first "cool" boards was a kryptonics foam core.


Awesome board. This model was 10 x 30. It had a P-Tex base, a rubberized bumper around the outside, and a pretty cool shape.

They were also really heavy. Any real attempt to repair the P-Tex base like you would skis, only seemed to magnify the damage. You tended to wear holes in the base revealing the foam core.  I think I broke a couple of these in half.. ( This model, and the other 10" model.)

Because of the unique styling, it was almost popsicle like... The nose and the tail were very similar, although the nose did not have a kick and these things were flat as pancakes.

I had a dream to reproduce this board, only with a modern twist... Make it concave and have a double kick.  Why not just make is a full popsicle shape?


Woot!  That is what I was thinking of..

The top of the old board was distinctive as well.


You can clearly see the bumper ( more in the tip and tail than sides ) and the 3 kyrpto stickers in the middle.

Here is my pop core remake.


I have to let the core paint cure, and then I will finish the lettering, pop some green kyrpto wheels on, and skate this thing.

Feels just like 1978...

The Greatest Board Never Made

Here is a shot of my favorite skate photo...


Ted Terrebone took this photo at the 1979 Dog Bowl Pro at the Marina Skatepark. There were so many cool things about this shot. It is a colorized Black and White giving it depth. It was one of the first shots of a west coast rider doing an Ollie air. Gelfand had been shown pulling ollies in Florida, and it was only a matter of time before more people started pulling them off. But this shot of Bowman really captured the move.  At this contest, I think only Dennis "Polar Bear" Agnew and Bowman were doing ollies.  **The shot of Polar Bear olie'ing the hip at Marina is pretty famous too. 


Another classic Terrebone shot.

I loved that Bowman shot... I probably looked at it a thousand times, and then I really looked at it... What board is that?  Just prior to this picture in the April 1979 Skateboarder magazine, all Bowman shots where of him on the Sims Bowman 10" board. All shots after, were of him on the Sims BB superman board. 
Clearly this is a prototype board. What was the story on the board? Luckily, I am friends with Brad Bowman on facebook, and he was asked about this particular board recently.

Another friend of Bowmans asked :
"HI BRAD....CAN YOU TELL ME MORE ABOUT THIS PIC FROM THE DOG BOWL PRO AT MARINA APRIL 1979...EARLY PROTO DECK?...SIMS CONICALS?"

And Bowman Responded :
"Yes-early proto for the 10.75 pig that I made in my yard. 2 were made by myself for Bert Lamar and I to ride in the Oasis Gold Cup and Dogbowl Pro. Super collectors items. I have no idea where either are!"


So, there we have it, right from Bowman.  Now I had to make one.  First off the only photo I had was the colorized black and white. And that, while super cool, is not the true color of the board. So I started digging for another shot. I finally found a shot, that someone (**sorry I did not get a name of the photographer. )  took at the practice session for the dogbowl.


Awesome shot of Bowman, the invert, and the board.  And now we know the real color of the board. 
The good news, is that the shape is classic Bowman.  Scaled of course, to 10.75 wide.  That is easy to do.
Calculating the routes, based on the truck size, and the angle that the shot was taken from is a little more difficult...

And here we go :


Yes, I need to finish it.. I had a little trouble with the screen, so I am going to redo the signatures.. I will post those up when I finish.   But, isn't that the most awesome board that never got made?


Monday, February 20, 2012

Longboards

I used to think that longboards were not that fun. Oh sure, every once in a while it was a good time to bomb a hill, or carve big S turns down a slope. Even then, I never really had a dedicated longboard. I would use and old school pool shape and throw some big soft wheels on, and go cruise.

When I started skating a lot more, and building my own decks, I nabbed one long board to have in my quiver. I took it out a couple of times and it was fun, but I was almost entirely focused on vert skating and building pool decks. ( Still my primary focus for builds )

I just took a new job, were parking stinks. If I want to park near my office, I have to pay at least $20 / day, or
buy a parking pass for $250 / quarter. Ouch!  I found a place about 8-10 blocks away that I can park, and walk in... or skate in!  ( I don't have a bike rack for my mini cooper, but that may happen for snow days. )

The first day I took my Beer Run deck. It is a really fun deck to ride, and a good overall cruiser.


11 X 30.  Deck, nice and stable, Tracker Darts 215's with bones SPF wheels.  The bad thing about the ride to work, is that the streets and sidewalks are like cobblestone. Our office is in a older section of town, where the sidewalks are pretty narrow, lots of heaving ground, and lots of commuters on them walking, and riding.
The Beer Run is a blast to ride around my neighborhood, and some at the skatepark, but in these conditions it was not the right deck for me.

I busted out my trusty old longboard.  It is a vision 9 ply, with Randal trucks, and Red Kytponics 70mm wheels.  Rides great, stable while I have my backpack on, and is a lot of fun. The notion returned to me of my skateboard, not only as a great way to have fun, but also as a great mode of transport. When I was a kid, I would skate for miles to get to a ramp or a ditch, so that I could skate that for hours. Now my commute to work was fun again.

Now I have a trio of longboards.


Never Summer ; Sector 9 ; Vision

Three great ways to get to work.

Sunday, September 11, 2011

Super Eight

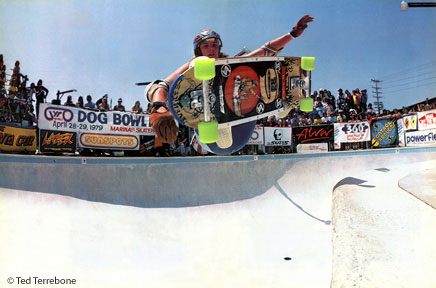
One of the best, most fluid skaters of all time was Brad Bowman. I got to see him skate a couple of times at the Hi Roller park in Boulder, Colorado. Bowman along with many others of that time, had a very smooth surf style. These were guys that started out surfing, and then moved on to be great skaters. This style is rarely seen in modern skate times, but was awesome to watch 'back in the day'.

Bowman was also the first guy I ever saw ( in person ) pulling off high ollie airs. He also had one of the coolest boards of the the time. One in the Sims lineup that shaped skating in 1979-1980.


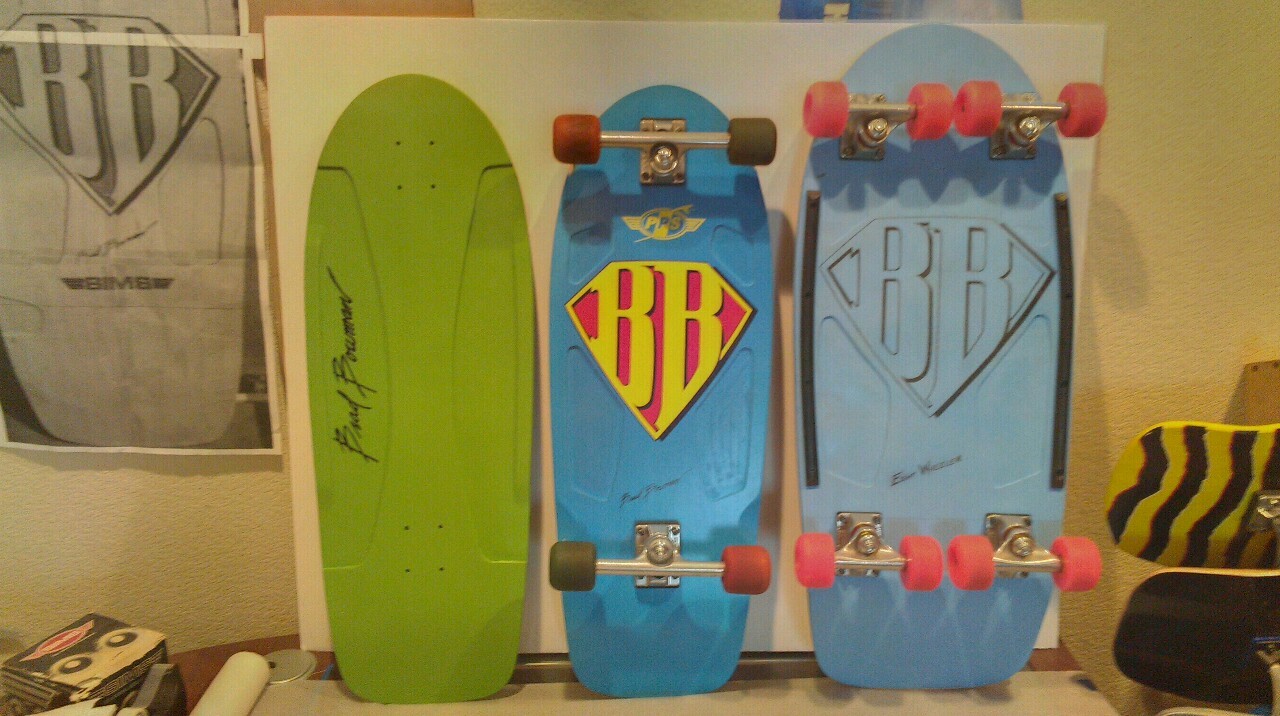
The Superman BB logo was iconic, as was the routes and shape of the board. My friend Richie, skated one in 79, and he was pulling off huge frontside and backside ollies on it. That made me want one even more.

Recently, while I was sketching designs for my "next" build I drew up a couple of ideas for a massive Eight wheeler.


A Bowman Eight Wheeler!  That would be so cool.  As you can see, I am not an artist, I rough sketch ideas, and then work them down to full size mechanical drawings as they come to life. The sketch was done in my good old paper sketchbook, but now I have switched to doing all my sketches in Autodesk Sketchbook Pro on my Motorolo Xoom android tablet. I can transfer my electronic sketches to my computer where I can then start mechanical drawing using a CAD program on my Ubuntu Linux system.

** Sidebar note.  I did the KBeam build all by hand. No computers involved. It was more an exercise in hand crafting a deck than using technology.

First up on this build was dealing with the size of the deck. At 14" X 34" it is huge. I scoured the planet looking for maple laminate that comes in that width, and did not find any that I wished to pay huge amounts for. Yes, it exists but in small lots it is really expensive. I talked to the guys at Factory 13 about getting wood from them, and that would not be too costly, I even though about having Danny make the board for me, but in the end, doing the build myself is why I do this, so I opted for another path.
I edge banded 12" or less laminate to create my own 16" wide layers. I staggered the banding widths so no edge band would lay on top of another to maintain strength throughout the board.

Creating a Bowman board, means that I need to not only work on getting the graphic and routes right, but I need to get the exact shape of the original scaled up to the size I need. I use Qcad and Gimp on my linux box to scale images and to build patterns for the build. This is also the last build I am doing using my custom vacuum press system. I am in the process of building a 12 Ton press with interchangeable molds to facilitate better and more exacting deck builds.

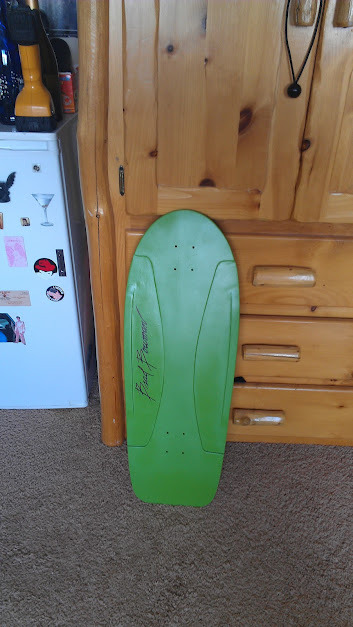
I created the mold for the deck, and layed up the edge banded plys, and pressed up the deck. I layed down the shape from the template I made on my computer, and rough cut the shape.


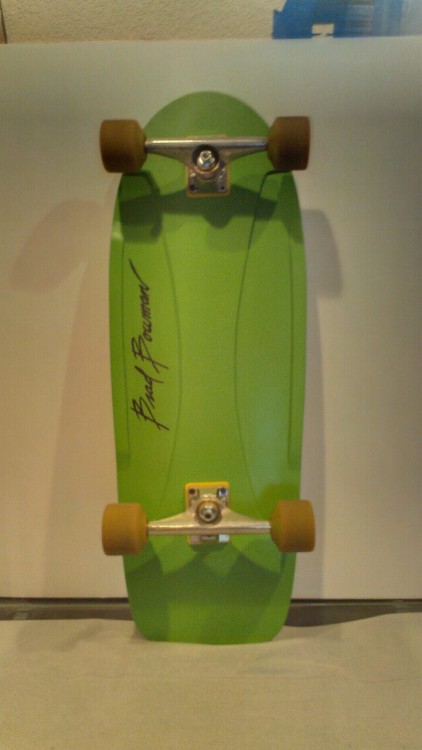
Now that is the Bowman shape!  You really can't tell from this picture, but that thing is massive.
Next, from my templates, I laid out the routes for the deck.


To give you an idea of the size and what the final result will become, I set some trucks and wheels on the in-progress deck.


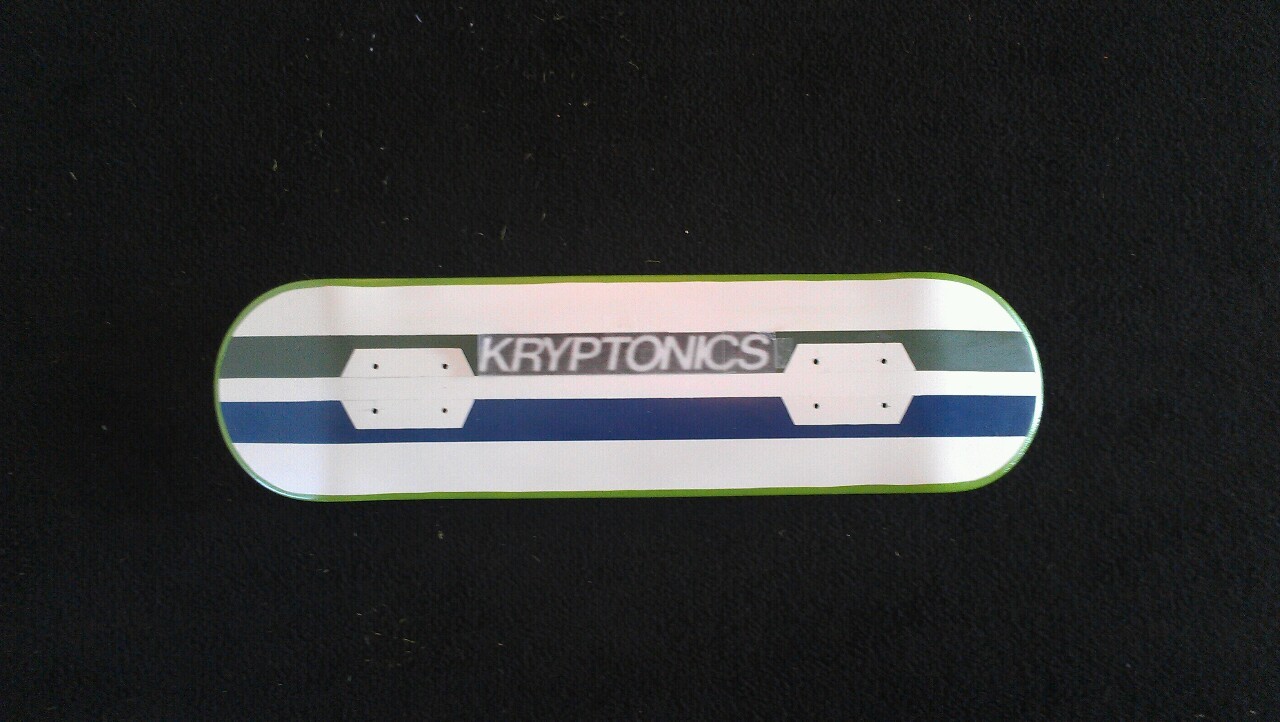
I build a jig, for the routes and carefully removed the routed areas.  While the original Bowman deck always came in blue, there were two shades, A dark blue, and a light blue.  I always liked the light blue colorway, so I went out looking for a color match.


It is really starting to look like a Bowman deck now. I had just purchased silk screen supplies and a large screen and was planning on doing all the graphics that way, but fate took over. Actually I got fired up to work on the deck, and my paints for the silk screen had not come in the mail yet.  So I grabbed up my art supplies and paint brushes and started laying out graphics by hand. First, in pencil to get the layout right.


And, then I grabbed up my paint brush and laid down the black outline.


At this point I was struggling with the Sims logo above the BB. I didnt like the way it was coming out by hand, and I was really getting the itch to ride the board. I also really liked the black outline on the blue background. The more I looked at the deck in this state the more I liked it. I decided to not add the red and yellow to the BB logo, and to change out the Sims logo.

I want through a design session with my friend Morgan Whitney ( an excellent programmer, and graphic designer, and overall talented guy )  Here is a snippet of our design session.  This session was entirely done just to try and replace the Sims logo with something that reflected all the elements of the build.


Again, a lot of my builds and designs start with rough sketches. While there were some awesome ideas that came out of this session, I chose to not use any of them, and scrap the logo for a sticker. Just because I was so excited to ride the deck.

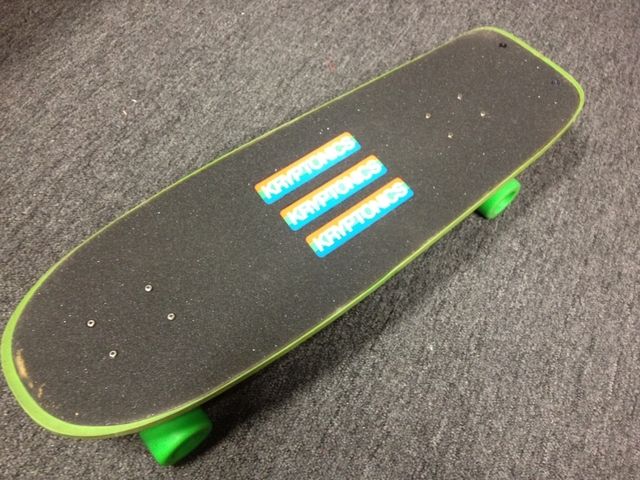
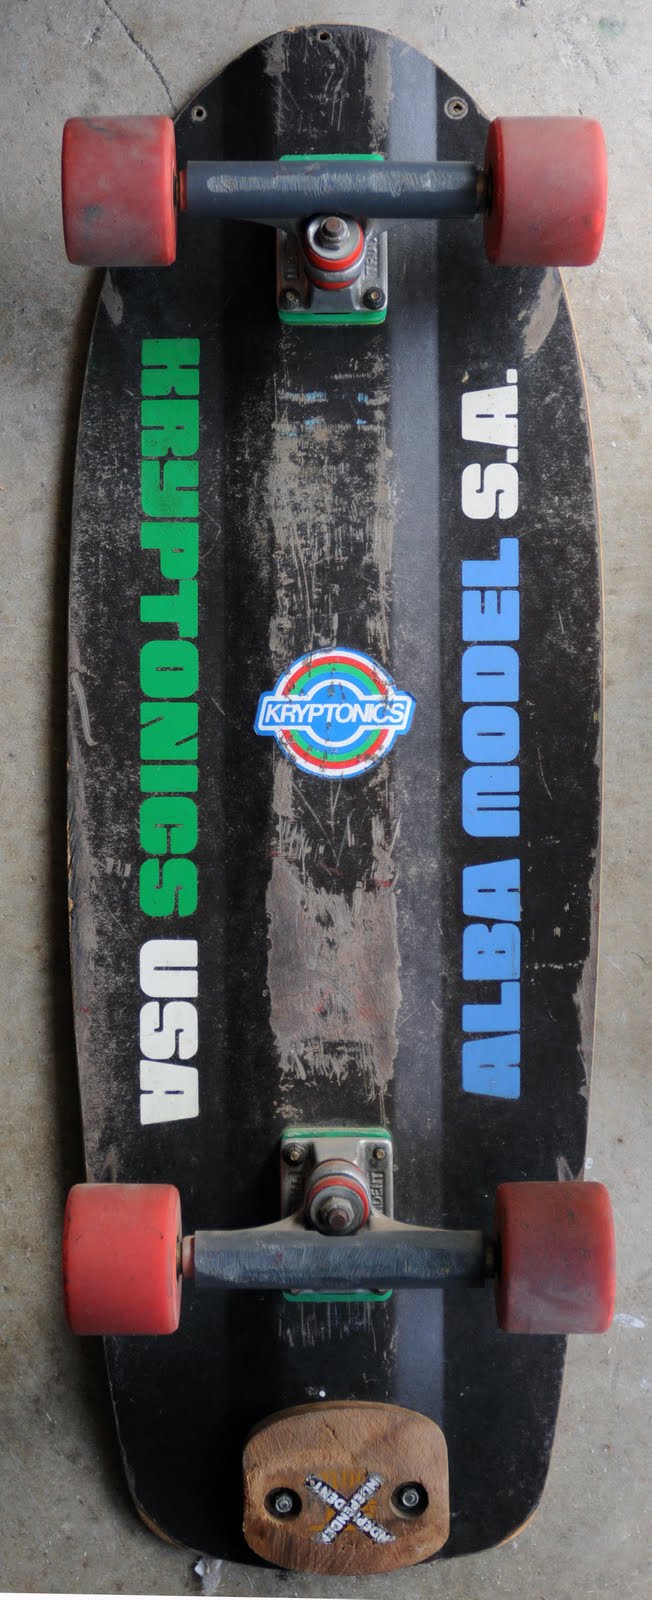
As seen in previous photos, I had purchased trucks and wheels for the board. Tracker mid-tracks, and Sims 63's.  I drilled up the deck, gripped it, and mounted everything up.


This thing is a beast. Having never rode an eight wheeler before, I had a lot to learn about moving around on a deck that large, but one day at the skatepark was enough to convince me that everybody should have one in their quiver. It is a blast to ride, and a great feeling to hang 7 wheels out over coping!

Saturday, July 9, 2011

Revisionist History

I had the distinct priveledge of having skateboarding create a new friendship recently. My wife and I went over to a friend of hers to pick up some apples to make pie. My wife had told me that her friend was from the same home town as us (Loveland, Colorado) and that they had put peices together that they had known each other from high school. When we got to her house, I met her husband, Dean. We begin chatting about what we did for a living, and what we did for fun. We talked about making beer, and music. Dean and I both had very similar interest and we really enjoyed getting to know each other. Then, I mentioned my board building...  Dean was a skater too! He grew up in Longmont, and skated there in the late 70's. He also hung out at the Boulder Hi Roller skatepark, and went to the Hester series pro contest down there. He and I had been at the skatepark at the same time. We swapped stories, and dug out some pictures and had a great time.

A bit of time later, I ran into Dean's wife over at the school and she asked me to create a board for Dean. Actually she asked me to build a skateboard for him. I am not sure now, if she meant put together off the shelf parts to build a skateboard, but I took it as creating a skateboard for Dean.  Now, when I was over at Deans house earlier, one of the things he pulled out of his skate memorabilia was a almost pristine Sims Bert Lamar deck from 1979.  I actually brought that deck home and made a template from it, just in case I ever wanted to build a Lamar.   I knew that Dean skated Sims in 1979. That is the starting point for the design.

In 1979 Sims released a now famous line of decks. 


There was also a Folmer model that was released during this time, Stinger cut in this line. 
My thought on the design was this : What if Sims made another board in 1979.... for Dean. What would his deck look like? How would it fit into this line of decks. 

My first sketch up


 I like the rounded nose of the Bowman on this sketch, the stinger shape of the Lamar, Andrecht and Folmer.  I created a custom font, that runs down the center. A signature below that. Large routes down the side would lighten weight and provide long grab rails. I imagined the colorway in White and Blue.

A few revisions later a created a template


By this time, I had moved the stinger cutaway forward, changed the font to a more traditional Sims style font. The routes stayed long and large.

I made a few more revisions. I decided that a stinger shape would not have been done in 1979. Sims had three stinger shapes already,  they would not have done a fourth. The color scheme could not be white / blue as The Lamar was already done that way.  That also leaves out black, and blue as base colors. 

I pressed the maple laminates and decided on the final shape. 


The stinger is gone. I decided on the base color of red. Actually this red was color matched to Sims wheels from 1979. I liked the blue in the routes, but I went back and forth if that color worked well in the overall line of Sims boards from that era.

I obtained Deans signature from his wife, and created a screen to lay it down on the board. I Further changed the font for the name to more closely match Sims from that time. I initially was going to ask another builder friend of mine to screen foil inserts for the routes, but ultimately decided against it. I decided that Sims would have done a different design for this board to seperate it from the Lamar and Andrecht.  A special design was needed that goes along in the line. 

First layout.


This scheme looks nice, I really liked it. But, I had chosen a brighter red to highlight the lettering and logos, and it does not show up well enough. Looks like another revision is needed. 

Final layout


I gripped up the board in Blue and Black.


The components that paired with the deck are Sims wheels from 1979, and Gullwing trucks (stage IV).
And the best part of this build was a few days later, when I got to present the board to my buddy Dean.


Monday, September 27, 2010

Skateboard Refactoring and Reuse.

In software engineering we use the terms refactoring and reuse a lot. We refactor code, to make it faster, better, or as we say, "more elegant." We take something that is working fine, and make it work better.
We also design software in reusable blocks. That way we can use that same block in another piece of code, or application. That way we do not have to write database lookup code over and over, or "write this data to a file" code again and again.

In skateboard design, there exist a similar principles. Deck shapes are pretty standard, there are probably around a dozen or so, with slight variations in nose or tail or side cut. They work well, and have been refactored over time to be pretty elegant. You could say these deck shapes are reusable blocks, that vary only slightly.  There are some notable exceptions, the tombstone shape, the daggertail, beamers, and punk points. Of course, there are large variations for types of skateboards, street, vert, downhill.

There are occasions when there is a confluence of these things. A time when you are reusing code, and refactoring to make it more elegant or functional. This is what this skateboard build is about.
My two favorite Santa Cruz skateboards are :  The Santa Cruz Stinger and the Bevel.  I had always planned on building a stinger, it was one of my very first decks, and I loved skating it. The Bevel was one of, if not the first concave boards. ( That fact is claimed by several decks and manufactures. ) The Bevel had a very steep concave, a big kicktail, and was awesome. The stinger, was a 7 ply deck, 11 inches wide in the nose section, and tapered down to around 10.25 at the tail. There were routings on the deck to reduce weight and provide grip. Both decks at one time, came in a bright yellow with fairly simple graphics. The Bevel with either the word "bevel" and the Stinger with a bee and the Santa Cruz logo.

The reuse : I am going to combine the two decks. The big stinger shape, and the steep concave and kicktail.

The refactor : I am building it in blue, with new graphics, and my own route design.

First order of business is to lay up the plys.


I used the same technique to get the shape, as I did for my KBeam build. I got a good straight on shot of the stinger, and then using known sizes for the original deck, and a little math, I had a ratio to build a template.  Or again, half a template, that I trace onto folded butcher paper.

On the last boards I have done, I bend the "square" stock, and then apply the shape. The next board I do, I am going to rough cut the shape first, and then glue it up. I will take it to the final shape after that. There are some issues with doing it either way, but I think the rough cut version might have fewer issues. A template placed on the top vs. the bottom of the deck might have a variance of up to a 1/2" depending on the depth of the concave. This has to be taken into account for either method. so the rough cut shape has to be at least that much larger than the final size.


Lots of concave on this one.


I traced the template on the plys, and did a rough cut to get the shape. I try to stay between 1/16 and 1/8 of an inch away from my template line during the cut.


As you can see, I am using the whole width of the laminate that I have. If I ever want to make a Dogtown Pig ( 12" ) I am gonna have to get wider maple.


I use a disk sander, and starting with 60 grit sandpaper, I take the board down to the template line. Once I hit the line, I switch to 220 grit to take out the rough spots, and as I get closer to finished on the edges, I go to 600, then 1000, then 2000 grit sandpaper.


Next, I did the layout for my custom routing.


I colored in the route areas so that it is easy to see against the blue background.
The routing is kind of a pain in the rear, but I got it done.

I am going to lay down custom graphics for the middle of the board, and in the routed areas...


I will add more to this post, as I finish out the routed areas and grip it up..

Sunday, August 29, 2010

Recreating a legend. Building a K-Beam

If you took a poll of people who skateboarded in the late 70's / early 80's, you would find a strong majority of the skaters rode a Kryptonics K-Beam at some time or another, and most of them would list it as one of their favorite boards. In that time, there was a great amount of innovation going on in skateboard design. By 1979 boards had gone through the "pig" phase and gotten larger, but as a result they had also gotten heavier. Many companies tried various methods for reducing weight. Foam cores, fiberglass, even Kevlar were used to try and get the right combination of strength and weight.  At that time, one skateboard manufacturing plant was building a lot of the boards, and that company was Boulder Boards. Their boards got re-branded by Dogtown, Variflex, and Kryptonics too name a few. Boulder Boards was very creative in engineering lightweight, strong boards. They would route out wells in the boards to reduce weight and provide grip. They also came up with the idea of instead of using 7 layers of laminated maple, they would only use 5, but they would place a band of vertical laminate down the center of the board to increase strength. The vertical laminate was the "beam". Other companies used 5 ply boards with additional horizontal beams to accomplish this strengthening as well. ( Powell Beamer, Alva LiteBeam ) Those worked well too, but the vertical beam was by far the most innovative. That board got built for Kryptonics and was named the KBeam. They made a 9.00" wide team version, a 9.75" wide Micke Alba model, a 10.5" Steve Alba model, and a 11.25" team model. After the first run, a second Micke Alba model was made with 3 vertical beams, one down the center, and two on the outside edges that created grab rails. This was called the tri-beam. Not very many of those were made, and I never personally saw one, and only recently have seen pictures.  Later a concave team model of the K-Beam was made called the Competition K-Beam. Again, I have only seen pictures of that model, as it must have been a limited run. Boulder Boards also made a vertical beam board called the vertilam that was for a  George Orton model. The vertilam had the entire middle laminates vertically placed in the board.

Now, around 1980, the skateboarding industry went through a down phase, and many companies stopped making as many boards. Boulder Boards was affected by this downturn as well, and many of the boards made at the time were stopped. 

If we skip forward to present day, skateboarding has made quite a resurgence. Many companies make boards, and there are skateparks in almost every town. Modern day boards have evolved to be smaller than their 1980's counterparts, mostly to allow for more quicker flatland / street tricks to be accomplished. Many "older" skaters still look for that larger, pool board that they knew in the old days. Some companies have re-issued the old shapes, and old school skateboard decks can be found in any skate shop and online.

The new shape (Popsicle) may be as evolved as a deck can get, but it lacks style. The innovation seems to have dried up. There are no new shapes really, and certainly no company is pushing the limits of engineering to make lighter or stronger boards. I have a couple of  these boards and they are ... ok. Having skated in the 70's, 80's, 90's, 00's, and now 10's I have tried just about every shape size around.


The shape / size / style of board I missed was the K-beam. More specific, the 1979 Kyrptonics Steve Alba model kbeam. I went to ebay, looking for an old shredder. They show up every now and then. But, holy crap! $1000 - $2000 for an old deck. I decided right then, I would build my own. 

Building a standard skateboard is pretty easy. You need some maple ply, good glue, a press or mold and a few hand tools. And you usually start with a shape you have. I did not have a Kbeam to trace, or measure, and I certainly was not going to plunk down $1000 to trace one. So I started with one good picture of one.


Working from an image is pretty easy, if you know at least one measurement. I knew several. The Kbeam was 30.5 inches long and 10.5 inches wide. Since it was "old school" the truck bolts were 1 5/8" x 2 1/2". Using calipers and a scale ratio from a printout of the above image allowed me to create and exact template of the full sized board. Actually the trick is to make half a template, that way you have an exact shape for both sides. 


I then transfer the half shape to a folded piece of butcher paper.

Next, I did all the layouts for the beam dimensions.


The beam, originally was vertical plys of poplar to increase strength. I got some poplar laminate, and glued up the layers.


The real trick with the beam, is cutting the kicktail to the exact degree, while maintaining the angles of the beam running length wise. As you can see from this advertisement for the kbeam from 1979.


At this point there was a gap in building while I did lots of calculating of the angle of the kicktail. In 1979 The angle of kicktails was much less than boards of today. I really wanted to build an exact duplicate, but I also did not want to ignore the benefits of steeper kicktails and concave. I deicided to go with a modified 1979 Salba model, with higher degree kicktail, and a slight concave.

Next was making a mold for the deck. This can be done using a mold of the top and a mold of the bottom made out of hardwood, or cement. Those molds are then fitted to a press to apply pressure from top and bottom forming the horizontal shape of the board. Building presses like this is not terribly hard, but it is very time consuming, and takes a lot of material. If I were planning on mass producing the deck, then this is the way to go, but I am only planning on making a handfull beams. ( maybe 10 )
I pondered this for several days, and then I ran across the Roarockit thin air press.
( http://www.roarockit.com/ )  These guys have come up with a great way to build and design skateboards without the huge time and expense of building a top and bottom mold. Using a bottom mold shaped from 2" insulation and a vacuum system it is possible to bend and shape your deck.

They also sell maple laminate and glue with their kits. I bought the longboard kit, as I needed to fit old school shapes, and I have a couple longboards in mind for later. In the kit is a hand pump for pulling vacuum, and a one way valve on the vacuum bag.  I used the hand pump for about 2 minutes when I was laying down the first to layers of maple. It worked ok, but did not provide the vacuum I really wanted, and I knew that I was going to need a bit more once I was bending the plys over the beam. I tried using a vacuum cleaner, and a shop vac, but again I was not getting the pressure I was looking for. Luckily for me, my brother had a stash of Weller Fumux systems for pulling vacuum around soldering stations and welding. The Weller has a vacuum on two sides, and I got parts from the local Ace hardware to hook them in series, when I measured the vacuum pressure it was ~45 PSI.  That was just what I was looking for. The foam insulation can take about 50 PSI, so I was pushing it right to its limits. I then removed the Roarockit one way valve, and attached the the Weller Fumex directly to the vacuum bag, so I would pull constant pressure on the deck. Here is a shot of it in action.


The black stuff you see on the top there, is a plastic netting that ships with the Roarockit kit. You must use that, as it provides an airspace for the vacuum. Without it, the opening will just suck down to the wood, and you will not get even vacuum pressures in the bag.


And here you go, here are some "action" shots of the developing build.

The original KBeam had a covering of yorkite on the top and bottom of the board. Yorkite is a vucanized paper product that had no grain, is very durable, but yet very thin. It added a strength to the board, and stabilized the wood veneers as they are bent around the beam. I looked high and low for some yorkite, and it is available for manufacturers, but I could not find any that would be sold to individual or in small lots. I called every manufacturer, and distributor, trying to get a sample size, or small lot with no luck. I did not want to buy a huge roll of yorkite and pull 6 feet off for my project. So here, I had to make a choice. I would continue the build without the yorkite backing. This complicated the build, as since earlier I chose to increase the kicktail angle. The beam had be glued and shaped with the angle I wanted, but that also meant that I was going to be bending the wood a LOT. The yorkite would have helped that, but since I had none, I would have to be very careful as I applied pressure to the laminates. This is particularly important where the kicktail is bending down, and the wood is also bending sideways along the angles of the beam. I was able to do this using a combination of clamping the layers early in the process, and then building the vacuum pressure up slowly as I was bending the laminates. 

Since I had no yorkite, I thought about how I wanted to finish the board. My first thought was to use a light black stain, to show the grain of the wood. I opted for a matte black paint, with clear coating to have the graphic lettering stand out more.


I hand cut the lettering, and created a template for application of the graphics. Once they were on, I finished the graphic by hand with a small paintbrush. I applied, a last coat of clear coat, and then wet sanded with 2000 grit sandpaper, to take out any small scratches or imperfections. Then I used automotive rubbing compound, to give it a glassy smooth finish.


So there is the end product.  I need to finish the top with grip tape, and the Kryptonics K from the day. I am going to do the whole top with a grip tape design using black and blue griptape. Overall, I am really happy with the end result, and will build a few more, ( one for my brother is already planned. )
I have a set of blue Kryptonics double conical wheels on the way, and some white trackers to complete the setup. I am going to look for some white slider to mount, and may make a custom tail skid for it.


Oh, here is my recreation of Steve Alba's Kryptonics KBeam model next to his current model made by Factory MFG.


And, the inspiration.

I got the griptape in to finish the top. As stated above, I wanted to do the entire top design with griptape, rather than painting and putting on clear griptape.

Got the blue Kryptonics K on.


Now I need to cut and place the black Jessup grip.


I really like the way this turned out.  Now a few shots of the board setup, and completed.